SAS 3 Maps Guide: Tips and Tricks, Maps and Other Useful Information[]
Here is a guide to all the maps of SAS 3. At this moment in time, there are 5 maps to choose from in the "Europe" category. and 4 in the "North America" category. In multiplayer and private matches, you will not be able to pick your own map. The following 9 maps are:
- Farmhouse
- Airbase
- Karnivale
- Verdammtenstadt
- Black Isle
- The Office
- The Street
- The Foresaken Asylum
- Civic Center
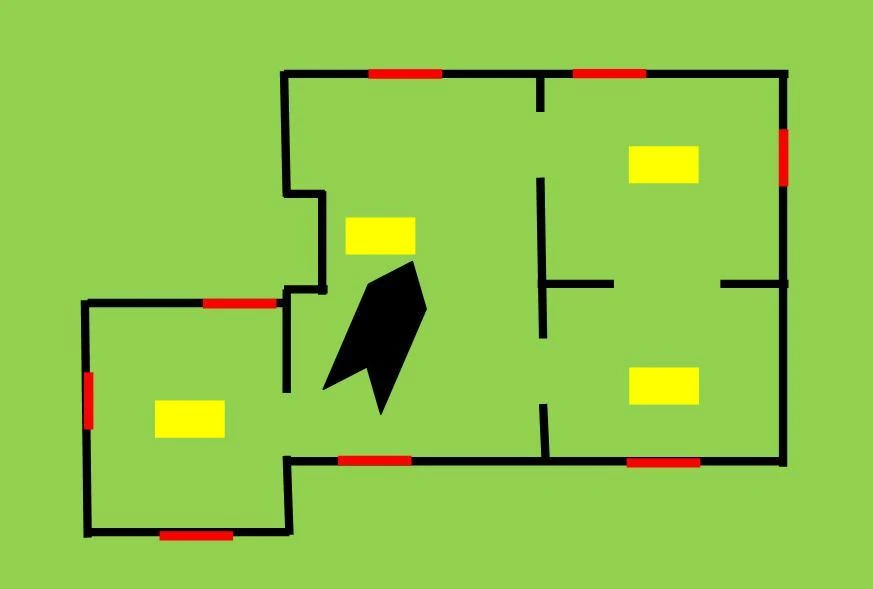
Farmhouse[]
4 Random Box Spawn Points
Farnhouse is the first map you unlock and is the smallest map on the game. It is set in a Farm House which you

Good places to put sentry guns
have to hold by any means until back-up arrives. It is 1 of the hardest maps on the game on Mulitplayer, but on singleplayer is considerably easier because of the amount of zombies and the layout of the rooms allow you to plan your route and see a lot of the zombies. The good thing about this map is that you have no devastators to kill due to its' small size. You start next to a fireplace in the middle of the largest room. There are 8 barricades, where all the zombies enter from. A good tactic for multiplayer is to 'Camp' in the south-west room with 4 players and cover an entrance each. A good tactic for single-player is to basically go around the map and repair baricades.
Here are the Random Box Spawn Points and there are 4 in total. You get a 40% exp boost at the end of the game which is useful because of the lack of zombies you get in the game but the lack of zombies still make the xp and money value much lower than that of another map like Black Isle.
Airbase[]

Good places to put sentry guns


Useful moves for the Map
Airbase is the second map you unlock after challenging Farmhouse, and is a mid-sized map. It is set in an overun Airbase where you have no support and have to fight alone to destroy the zombie waves. This is a hard map on multiplayer and on singleplayer due to the lack of space and the many places in which the zombies can enter from. The layout of the map is a base of 2 large rooms, the bottom one smaller then the top, connected by a corridor with broken cars blocking your path straight through, creating a curved pathway. You start in a small room at the bottom of the map, and there are 10 barricades where zombies can enter the map from.


8 Random Box Spawn Points
A MUST DO tactic is to straight away get to the top room! It is a lot easier to control and you have a larger space to run around in. Another good tactic for this map on multiplayer ONLY, is to sit in the bottom room, where you spawn at the start of the game, and do the same as on Farmhouse, with 1 person covering each entrance.
Here are the Random Box Spawn Points and there are 8 in total. If a Box spawns on the other side of the map do NOT try and retrieve the box in the middle of the round, go at the end when there are no zombies.
This map also gives a 20% exp boost at the end of the game, which is very handy considering you get less zombies in the game.
Attention: Devastators can spawn here. This may be very difficult due to the small area. Try running back and forth in the lower room and the large room. Try to avoid the Dev's Area Attack.


Good places to put sentry guns
Karnivale[]
Karnivale is the third map you unlock in the game, after you have challenged Airbase and Farmhouse, and is a mid-sized map. It is set in a carnival which was once bustling with people, but is now packed with zombies and it is your job to clear them out and save the villagers.


Useful moves for this map
This is quite an easy map on multiplayer, but can get a bit packed once the zombies get in. On the other hand, playing this map on singleplayer will be quite hard if you have no premuims. The layout of the map is one big 'Room' and has many obstacles to navigate around and is quite hard to not lose any health on. You start in a burnt out tent in the centre of the map, and there are 8 barricades where the zombies can enter from.
Some easy tactics to do are to do circles around the whole map, cutting inside the map if there are too many zombies in front of you. If you do this tactic then when the zombies are spawning ALWAYS FIRE IN FRONT OF YOU, or else you will miss zombies and lose health. There are no other commonly used tactics on mulitplayer apart from guarding one side of the map and the other 3 in the other 3 corners and to shoot as many zombies as you can.


12 Random Box Spawn Points
Here are the Random Box Spawn Points and there are 12 in total. Most of the boxes are easily accesible, apart from the 1 at the spawn point and the one in the north-east corner of the room, above the Catherine Wheel.
There is no bonus experience for this map because of its meduim size and its dificulty isn't as hard as Airbase and Farmhouse, but can still be quite challenging due to it's layout of obstacles.
Verdammtenstadt[]
The Verdammtenstadt is the fourth map you unlock after challenging Farmhouse, Airbase and Karnivale, and is a large map. It is set in an old German town, which has been overrun by zombies, where you need to flush them all out and then your mission shall be over until the next map. Verdammtenstadt means "damned town" in German.
Unlike Farmhouse, Airbase and Karnivale, the zombies spawn from sewer holes, instead of having to break in through barriercades.


Camping Points (Black Dots) and Useful moves for the Map
On multiplayer and singleplayer, this is the easiest map on the game due to the wide, open spaces and the size of the map. The layout of the map is a large rectangle as the outside, with seperate rooms in the centre of the map, with a fallen statue in the town square that seperates the square in two. You start in a field on the far-east outskirts of the map, which is a good camping spot.


Random Box and Zombie Spawn Points
The most common tactic for this map is to gather the zombies in a line by circling the edges of the map and killing off the zombies in front of you, who try to intercept you. Like on Karnivale, only fire at the zombies behind you once you have killed ALL the zombies in front of you. There is also another tactic which is not commonly used, where you 'Camp' in certain spots on the map which channel the zombies through 1 entrance, to allow you to fire in 1 direction and to kill off zombies easily. On purge mode, a good tactic is to get all of the people to kill 1 nest and then move onto the others, another tactic is to have the same amount of people on each nest to stop the spread of the horde. On multiplayer these tactics can be used but the most common is to have 1 person on each of the zombie spawns and to kill them off by any means.
Moving into a small house can be effective if one player shoots the zombies that try to enter and the other one repairs the barriarcades.


15 Zombie Nest Spawn Points


Good places to put sentry guns
Here are the Random Box Spawn Points and there are 15 spawn points, 2 of which are placed on Zombie Spawn Points (in the centre square, the south-east spawn and the north spawn). The boxes that appear in the rooms should be retrieved when all the faster zombies have been killed and only Butcher's and Mamushka's are left. This map also has no bonus, which is because of the large size and low-dificulty of the map. The Random Boxes are also where all the Purge Mode Nests are so if you run over a Nest and randomly get a gun, then you've just walked over a random box, it's not a glitch.This map is 1 of the 2 maps that has the new game mode, Purge Mode, where different zombie nests appear and spawn all kinds of zombies every 3-4 seconds or so. Here is a map of the Random Nest Spawns on the map.
Black Isle[]


4 Zombie Spawn Points and Useful Moves (black) Must-Do Moves (red) Risky Moves (Orange)
This is the fifth and final map you unlock after you have challenged all other maps, and is a large map, maybe the largest map, on the game. It is set in a broken down castle on a small island, which was the where the zombies were created, and it's your job to clear out the zombies and be air-lifted to safety once the zombie waves have been crushed.


Good places to put sentry guns
This map is quite a hard map, on both singleplayer and multiplayer, due to the many rooms and many paths available, although it is the largest map on the game. The layout of the map is a kind of oval shape with an outer ring, and an inner 'Castle' containing many rooms and corridors to take, and has a 'Square' at the east side of the map which is a good place to start each round. You start in the south-east room of the map and it would be wise to get out of the room as quickly as possible. The most common tactic for this map is to go around the outer-edge of the map and just fire in front until the zombies have stopped spawning, like on Karnivale and Verdammtenstadt, once all of the zombies stop


15 Random Box Spawn Points
spawning, you can then start killing all of them behind you. A personal tactic is to stay in the main square on the east side of the map and try and kill as many zombies as possible until i get over-run, then go anti-clockwise (because i find it easier to go anti-clockwise) and follow the tactic above. There are no real camping spots on this map, but it could be argued that at the bottom of the castle there is a room with only 1 entrance that could be used to camp with a good gun, most likely good premiums (This can be used as a camping spot, but only with the Grendel, otherwise realoads are too slow). If all of your team camp here, you have a good chance of survival but if a devastator/mamushka comes, you get out fast(having a person with a CAW would be a wise choice as u can kill all the devasdtators/mamushkas/shadow before they come near so they are weaker and easier for the rest of your team to kill). For the new purge mode, a good tactic is to have the same amount of people on each nest so the horde of zombies won't spread as it could go messy.


Here are the Random Box Spawn Points and there are 15 in total, most of which are inside buildings, and should only be retrieved once all fast zombies have been killed, like on Verdammtenstadt. There are also
19 barricades which can be repaired for extra exp.
Like on Karnivale and Verdammtenstadt also, there is NO bonus exp for this map. This Map also has the added game mode of Purge Mode and here is a map of the random Nest Spawns on this map.
Other Information[]
When the closed beta was hacked, there was a map called Moldova Village. If the player joins a multiplayer/singleplayer game, he would be sometimes sent to a map called Moldova Village. Soon, the "Moldova Village" map would be one of the two maps, Verdammtenstadt or Black Isle. The Farmhouse, Airbase and Karnivale were added in May 2011.